Super Sizing the Winter Log Cabin

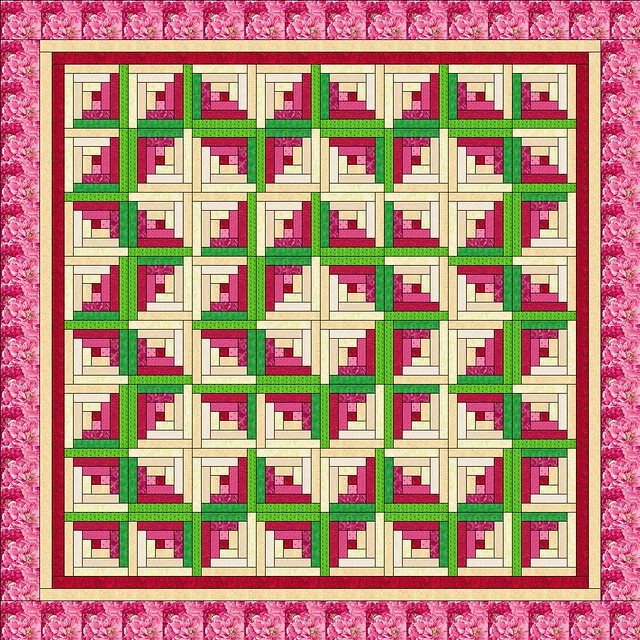
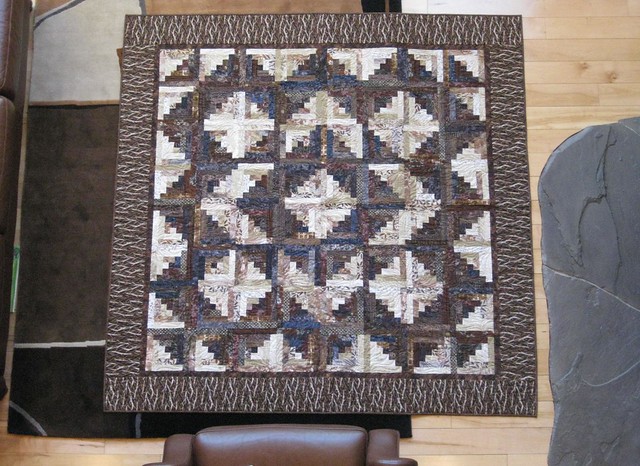
Shelly recently commented wondering how to make a king sized version of my “Winter Log Cabin” quilt. The original quilt seen below used 7-inch finished “cabins” where the “logs” were 1-inch wide each. It was eight blocks wide (56 inches) with 2 inch inner borders (+4) and six inch (+12) outer borders making the final quilt a nice throw size of 72 inches square.

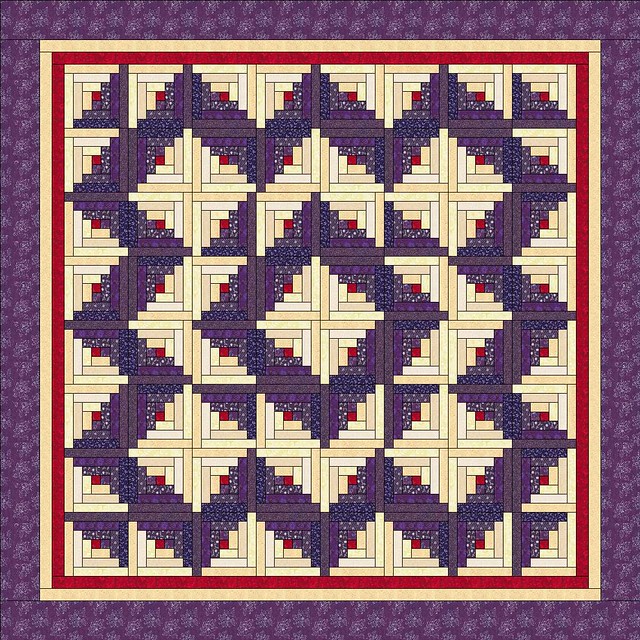
You could simply make the “logs” 1.5 inches wide (84 inches), add two 2-inch inner borders( + 8 inches) and a 6.5 inch outer border (+ 13 inches) and have a final size of 105 inches square like this nice cream and purple example I drew up in EQ7:

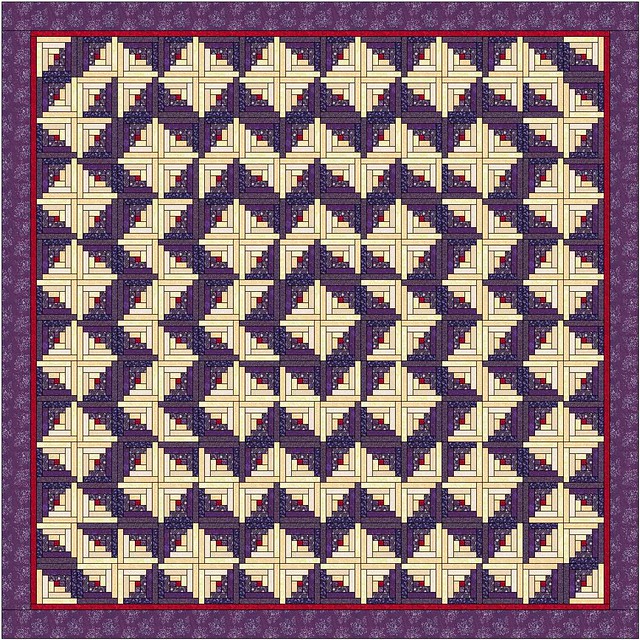
Or you could use the original 7-inch blocks and add some rounds for 14 7-inch blocks across (98 inches) and a 1-inch inner border (+2) and a 5-inch outer border (+10 inches) for a 110 inch square quilt like this:

Which do you prefer?

PS: I could not resist trying out this version when I noticed the corner block resembled(vaguely) a rose bud:
04

Posted in Brown Log Cabin | 1 Comment

A First!

I am so excited to see my article “Machine Embroidered Binding” published in the winter 2013 issue of “Quilting Quarterly” magazine. My article is one of the “trio of edge finishes” mentioned on the cover. “Quilting Quarterly” is the official publication of the National Quilting Association. Click here to buy a copy:

Posted in Quilting, Uncategorized | 1 Comment

Winding Ways – Final Stages

Eighty-One Individual Blocks:

Nine Rows:

Three Thirds:

All together now:

On to the quilting design!

Posted in Red and White Winding Ways | 13 Comments

Winding Ways Winding Down

Sixty-three down, eighteen to go!

Down to the last two rows of blocks and I am finally confident enough to sew these curvy liitle blocks without pins. I rely heavily on my very pointy tweezers though! Also, I am close enough to sewing the blocks together to start serious consideration of the machine quilting I will do. Should I keep it simple and just stitch-in-the-ditch around all the interlocking circles or should I fall back on feathers or, perhaps, I should take a “modern quilting” approach. We will see…

Posted in Red and White Winding Ways | 9 Comments

Over Half the Blocks

Forty-five down, thirty-six to go! I don’t know if I see the light at the end of the tunnel, but I can now believe there is an end to the tunnel! Those secondary pattern circles are really popping out all over now.

And how about the backing I bought? What looks like shadows is the layer folded beneath showing through. The red dots are about 1/4 inch in diameter and they are about 1 inch apart. The dots are randomly scattered rather than in aligned rows. I like it!

Posted in Red and White Winding Ways | 5 Comments

Real Progress on the Winding Ways

Twenty seven down, fifty four to go!

I am 1/3 of the (winding) way in the block construction phase. Hooray!

Posted in Red and White Winding Ways | 11 Comments

Winding Ways Progress Report

Ten down, 71 to go:
IMG_2921

I think I have found the best methodology for me for sewing Winding Ways blocks: pin, pin, pin! I tried my Curve Master foot which I have used with success in the past and I tried a couple of pin-less methods as described on You Tube, but I have decided I get the fastest progress and most accurate seams by simply pinning a lot! You gotta do what you gotta do! And I used a quarter inch foot.

I am loving how the secondary interlocking circle design is becoming apparent now that I have a few blocks completed.

Posted in Red and White Winding Ways | 3 Comments

One down, eighty to go…

… on this Merry Christmas Day!
IMG_2919

Posted in Red and White Winding Ways | 7 Comments

Preparing Fabric for Red and White Winding Ways

Normally, I do not pre-wash fabric before making a quilt. However, when the quilt will have 20 different red fabrics, it is a different story. Red has a tendency to “run” when washed. I did not want a red and pink quilt after all, so I pulled 20 fat quarters of red fabrics and washed them twice with two Color Catcher sheets in hot water and Synthrapol and dried them in the dryer. Synthrapol is a special detergent used by dyers to remove excess dye and Color Catchers are little sheets of non-woven fabric that absorb “fugitive” dye during washing. I felt like I had done a reasonable job of preparing the “reds,” but you cannot wash half the fabrics and not wash the other half (the neutral background fabrics), so they were washed in hot water and dried as well:
Twenty fat quarters of “reds”:
IMG_2863
Twenty fat quarters of “neutrals” :
IMG_2864

Of course, now that they were laundered the fabrics lost a lot of their “body.” So I prepared some home-made spray starch and sprayed and ironed dry all 40 fat quarters. It took two quarts of spray starch for this step.:
IMG_2867
Two stacks of nicely prepared fabrics. Preparing the fabrics required a couple of days work between other activities.:
IMG_2868

Next, I (with the help of a friend) ran all 40 fat quarters through the Accuquilt GO! using the “Winding Ways” die set. All this cutting resulted in enough pieces for 81 eight-inch blocks. This step took less than two hours. Finally, ready to sew!:

IMG_2918 copy
I’m thinking I love my Accuquilt GO!

Posted in Red and White Winding Ways | 5 Comments

“Starlit Forest”

I made a little wall-hanging for my daughter this Christmas season. The paper pieced pattern was in the November/December 2010 issue of “Quiltmaker” magazine:

IMG_2731 copy

You have to understand her house has a bathroom with aqua walls, a bathroom with bubble gum pink walls, a bathroom with Caribbean blue walls and a kitchen with aqua flooring. I hope she can find an appropriate spot for this little guy at least during the holidays.

Here are some close-ups:

A star:
IMG_2718

A slanted tree:
IMG_2723

A chunky tree:
IMG_2724

A triple layered tree:
IMG_2722

The borders and binding from the right side:
IMG_2726
The border from the backing side, little squiggly star quilting and dotted binding:
IMG_2715
I like how it turned out!

Posted in Starlit Forest, Uncategorized | 1 Comment